This chapter contains the following topics:
Introduction to Data (File) Recovery
Using Data (File) Recovery Utilities
Data (File) Recovery Utilities
Additional Inventory Control Utilities
Exiting Data Recovery Utilities and Log
Navigation Distribution History File Backup
There are several functions for which the utilities can be used. This chapter describes how to do the following and more:
| • | Recover corrupted data |
| • | Reclaim unused disk space using the export, restore and rebuild functions- rebuild is not available for an SQL table). |
| • | Use the extended and control file utilities for converting to a new version of PBS |
Throughout this chapter, data sets are often referred to as files. However many of the same functions in this chapter apply to SQL tables. Keep in mind that SQL databases also have their own set of data maintenance and data mining functions. They are not documented here. See the documentation that is provided with the SQL database for using those backup, restore, data recovery and data analysis functions.
Only PBS administrative users can use the PBS utilities. See PBS Users.
You may either have an installation that has a data organization of all COBOL Vision files or SQL tables with some Vision files. Vision files were developed by AcuCorp (currently maintained by Microfocus and are a type of COBOL file). SQL is often referred to as Structured Query Language, was first developed in the early 1970s and has evolved since.
This next two tables show the names of the batches that access the utilities:
Utility | Data Type | Utility batches and scripts | ||
Windows Accounting & Distribution | Windows Manufacturing | Unix and Linux Acct'g/Mfg | ||
|---|---|---|---|---|
Regular | Master and transaction data | ??UTIL * | ??UTIL | ??util * |
Control information data | CTLUTIL | CTMUTIL | ctlutil/ctmutil | |
Extended utilities | Master and transactions data | EXFUTL | EXMUTL | exfutl/exmutl |
Control information data | [n/a] | [n/a] | [n/a] | |
* The ?? refers to the module abbreviation. For example, AP is the abbreviation for Accounts Payable. Substitute the module abbreviation for the ??. This is a list of PBS modules, abbreviations and module group:
| Module | Abbreviation | Module Group |
|---|---|---|
Accounts Payable | AP | Accounting |
Accounts Receivable | AR | Accounting |
Check Reconciliation | CR | Accounting |
Customer Orders | CO | Manufacturing |
Capacity Requirements Planning | CP | Manufacturing |
General Ledger | GL | Accounting |
Inventory Control | IC | Distribution |
Inventory Management | IM | Manufacturing |
Job Cost | JC | Distribution |
Manufacturing Job Costing | MJ | Manufacturing |
Master Scheduling & MRP | MS | Manufacturing |
Order Entry | OE | Distribution |
Product Definition & Costing | PD | Manufacturing |
Purchase Order | PO | Distribution |
Product Purchasing | PP | Manufacturing |
Payroll | PR | Accounting |
Point of Sale | PS | Distribution / Retail |
Shop Floor Control | SF | Manufacturing |
System | SY | General |
Time and Billing | TB | Accounting |
Data file corruption occurs infrequently, but you do need to be aware of its causes and preventions. Corrupt files can be caused for a variety of reasons. The most common reasons are:
| • | Loss of power or “brownouts” while running PBS software. |
| • | The computer reboots while using PBS software. |
| • | Power surges while running PBS software. |
| • | The hard disk develops a surface defect. |
| • | Loss of connection to the server. |
Never power off or reboot your computer while running PBS software. Sometimes the power is turned off, or your computer is rebooted, by an interruption in the electrical power. Whenever possible use backup battery power to avoid this from happening.
Never shut down your computer while PBS files are open. As a general rule, always log out of PBS before you shut down your computer. If you are not using PBS for along periods of time, do not leave it open. Exit the PBS system. Log back in when you need access.
The most import thing to know; never ever shut down your computer during a posting. If your electricity is susceptible to power loss during severe storms or other conditions, save your work often. Post when the power loss threat has diminished.
We recommend that you use a UPS, uninterruptible power supply, to maintain power to the server in the event of a power outage. Also, whenever possible have the workstation on a battery backup. Laptops usually have battery backup capabilities built in.
The best and safest policy is to keep current backup copies of all Passport Business Solutions data files. See the Backing Up PBS Data chapter. If current backups are not available, you may attempt to recover corrupted files by using the utilities described in this chapter.
Corrupted data files cannot be used reliably, and any attempt to use them usually causes error messages, such as FILE ERROR 98. If you see a similar error message, or if you get unusual results while using Passport Business Solutions software and suspect there may be a corrupted data file, there are steps in this chapter that you can take to correct it.
You use these utilities for the following reasons:
| • | To recover from a corrupt data file index (Vision file only) |
| • | To recover from a corrupt data file (Vision file only) |
| • | To reduce the size and sometimes increase the performance of an indexed file (Vision file only) |
| • | To allow transferring data to and from non-Passport Business Solutions packages. See the PBS Field Definition Guide (PBS_FDG.PDF) and the Field Definition Guide for manufacturing (PBSMfg_FDG.PDF) for layouts of exported PBS files. The Data Import tools may also be useful for importing from an external application. See your PBS provider for information about Data Import and how to acquire it. |
| • | To allow user-coded data manipulations |
| • | To allow conversion from one file format to another |
| • | To allow upgrading to a new version of the software. The data is exported from the older version using these utilities. |
The data is upgraded to the new version using PBS EZ Convert. Files which have changed are upgraded using utilities supplied with the new PBS installation. When appropriate upgrading reformats the data to the new file layout and (where feasible) makes default assumptions for new fields.
| • | If it is the same version of PBS, you may use the restore to move the data. However, there are some print files and more that must be copied manually. EZ Convert is the best choice to move data from one system to another, even if it is the same version. See the EZ Convert documentation for details. Sometimes there are file changes within a version of PBS. Make sure the versions are exactly the same. |
The file recovery utilities are not intended to do the following:
| • | Back up PBS data |
| • | Replace Pathfinder functionality |
| • | Defragment your disk drive |
| • | Search your hard drive for disk errors |
If a data file index becomes corrupted, an error message of this general format displays:
FILE ERROR 98,00 ON CHARTF00 FILE.
CORRUPT INDEX FILE TERMINATION OCCURRED IN GLOBJ/COAADD
PLEASE WRITE THIS INFORMATION DOWN BEFORE CONTINUING.
This type of message gives the error number (98, in this case), the name of the file where the error occurred (CHARTF00), followed by a brief explanation of the error. When this message is displayed, all processing stops to avoid further file integrity problems.
Whenever you receive such a message, use the Rebuild a file selection as explained in this chapter. If this fails, use the Extract all recordsfrom a file selection followed by the Remake from an extract file selection.
Sometimes the data within a file becomes corrupted. The only indication of corrupted data in a file (versus a corrupted data file index) is missing or “garbage” data. Solving this problem can be quite difficult and may require professional assistance. In some cases, restoring from a backup may be your only recourse.
This function is used for reclaiming disk space for a data file. This function does not apply to SQL tables.
Use the Export utility in conjunction with Restore to shrink a data file so as to reduce the amount of space it occupies on your hard drive, as described below.
Files can accumulate unused space in the following situations:
| • | Files that can be periodically purged, such as: |
- Vendor History File in A/P
A/P Open Item File
- Cash History in A/R
- A/R Open item file
- Purchase Order Master File in P/O
- Invoice History Files in A/R
- Transaction History Files in POS
- Distribution to G/L Files
| • | Files that are periodically compressed: |
- General Ledger Transaction File in G/L
- Checkbook File in C/R
| • | Files that may have had a large number of records deleted from the file: |
- Vendor, Customer, or Item File
- Employee File
- Chart of Accounts File
- Transaction files for all modules
In the above cases, this space is reused by further processing.
For example, if you create more vendor history the new vendor history uses space that was freed up by the purge function. If you add new customers, these customers use space that was previously allocated for customers that you deleted.
However, you may wish to reduce these files to their minimum size (i.e. the minimum size required to hold just the data that is actually in use in the file).
In this case, use the Export a file and Restore from an export file functions to reclaim disk space.
The Export Utility does the following:
| • | Sorts the file sequentially |
| • | Ignores purged / deleted records |
| • | Converts the file to an ASCII format |
| • | Creates a new file with an .EXP extension to indicate that it’s an exported file. |
When you restore a file, all records from the ASCII export file are copied back to the AcuCOBOL Vision data file or to an SQL table. Make sure no one has entered new data in the file between the time you export the file and restore it.
Step | Description |
1 | Make a backup copy of the file. |
2 | Run the utility and select Export a file. |
3 | Select the file you wish to export. |
4 | Create a new export file. |
5 | Select the full range of records to export (First to Last). |
6 | Select Restore from an export file. |
7 | Select the same file. |
8 | Create a new data file. |
9 | Once the restore is complete, and you have verified that the recreated data file is correct, delete the export file. |
If you wish to run a utility function on all files (except control information data) for one or more packages and for one or all companies, refer to the Extended Utilities section.
If you wish to run a utility function on control data, refer to the Control Utilities.
The file recovery utilities are available from the Windows Start menu if they have been installed on your machine. From the Windows Start menu:
Click
Programs -> Passport Business Solutions -> File Utilities -> ?? File Utilities
Where ?? is the system ID of a PBS module (ap, ar, ic, etc.). For a complete list see Module List.
When accessing the utilities in UNIX, Linux or from a Windows command prompt, navigate to the top-level PBS directory and type in ??util.
You are prompted with the question "Would you like to generate a log ?". The default is N. Enter Y and the program will generate a log for the exporting, restoring or rebuilding that you are doing. For a log example, see Exiting Data Recovery Utilities and Log. Log files are generated in the top-level PBS.
If prompted, enter the Company ID of the files you will be processing. You have the option of selecting <F5> for all companies. Selecting <F5> means that you will be prompted to export the file for each company. This allows you to select a range of records for each. During the restore it goes through all the files without prompting for a range.
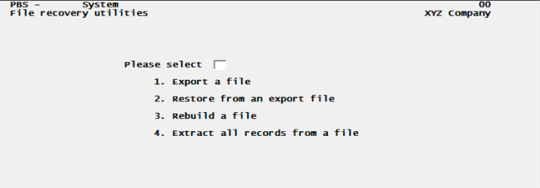
A screen similar to the following will be displayed:
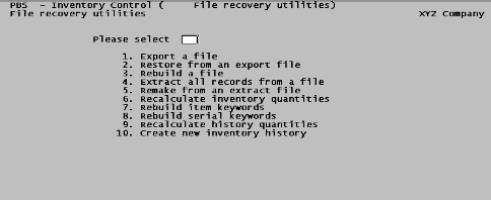
For Inventory Control, the following screen displays. Selections 6 through 10 are described in an appendix in the Inventory Control user documentation.
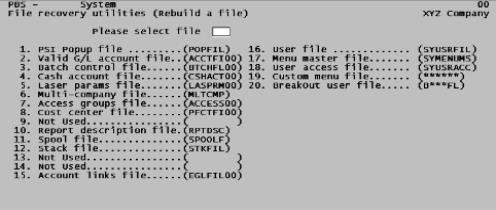
From the File recovery utilities menu, type 1 to select Export a file. The following is the screen for the system utilities:
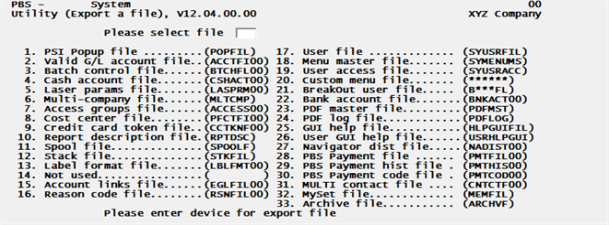
Some modules with large numbers of files, such as A/R and I/C, require two screens to access all the files. Press <PgDn> to reach the second screen.
As shown on the screen above, there are two names associated with each file: one is in English, the other is the actual file name. For example, the software recognizes the Valid G/L Account file as ACCTFIXX, with XX being the 2-character company code.
Enter the data as follows:
Please select file
Enter the number of the data file that you want to export. The numbers are shown to the left of the file names.
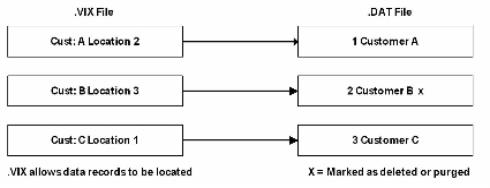
The file selection menu shows the name by which your computer recognizes your data file. A data file is composed of two disk files: one with a .vix extension (index), and one with a .DAT extension (data). An export file is a single disk file that has an .EXP extension.
Please enter device for export file
This is the drive on your computer where the export file will be created.
Enter your hard disk device letter here (usually C), or other designated drive if you want the export file created on a removable drive, thumb drive or DVD.
The export file has the same name as the original file, but with a .EXP extension. Any change ? then displays. If the data is correct, press <Enter>, otherwise answer Y, and make the changes.
(C) create new export file or (A) add records to existing export file ?
If you enter C (create new export file), then all the data in the previously created export file, if any, for this particular file is destroyed, and the data records contained in the data file are transferred to a newly created export file.
If you answer A (add records to existing export file), all the data in the existing copy of the export file is retained, and the data records contained in the data file are added to the existing export file. If there is no existing export file on the device specified, an error message is displayed if you answer A.
You are then asked to enter the starting file key and ending file key.
The most common response for these fields is to use <F2> to indicate First and Last. This indicates that you want to export the entire file.
Enter the exact starting and ending keys here to enable a partial export. The key has to be entered exactly as it appears in the record, with any leading or trailing zeros and spaces.
As the file is processed, a record count displays and increments by one for each record processed.
All Companies
If you selected "All" companies, then you will be asked the above questions for each company.
If there is no data for a company, then a message like the following displays:
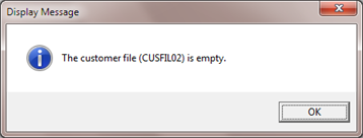
If a file or table is not present for a company, a message like the following displays: XXXXXX file is not present. Please copy this file to the location as defined in your Passport Pathfinder. Then restart this function.Select the OK button to continue with the next file/table.
Completion
When the export process is complete, press <Esc>. Then export another file through the above procedure, or press <Esc> to return to the previous menu.
When running the module utilities a log can be optionally generated. For the extended file utilities it generates a log every time. When you exit the program, it displays a message similar to this: Please review log file: xxFULT01.LOG . The xx is substituted for the module. For a complete list of modules see Module List. The number is incremented each time the utility is used and an existing log is found. The logs are generated in the top-level PBS. You may delete utility logs at any time.
Export File Contents
Each data record is written to the export file on a separate line in ASCII format. If the last field is alphanumeric, trailing spaces are truncated. Each record ends with a carriage return and line feed.
The export utility can be summarized in the following steps:
Step | Descriptions |
1 | The file is sequentially sorted. |
2 | The process ignores (not copied) purged records. |
3 | The file is converted to an ASCII format file. |
4 | Export creates a new file with the extension .EXP. |
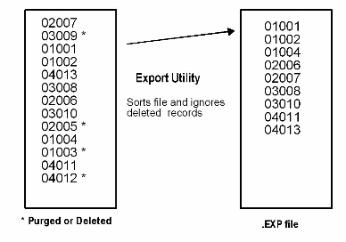
Note from the above, the .EXP file does not contain four of the original records (03009, 02005, 01003, and 04012). Only one of the four is shown to have relocated within the file.
From the File recovery utilities menu, type 2 for Restore from an export file.
A screen similar to this one displays:

Because of the large number of files, some modules (A/R is an example) require two screens. Press <PgDn> to reach the second screen.
Enter the data as follows:
Please select file
Enter the number of the data file or table to restore. The numbers are shown to the left of the file names.
The file selection menu shows the name by which your computer recognizes your data file. A data file is actually two disk files: one with a .vix extension, and one with a .DAT extension. An export file is a single disk file that has an .EXP extension on the end of its name.
Please enter device for export file
This is the disk drive where the export file to be restored resides. The export file is the file to be copied back to your original data file.
Enter your disk device letter here (usually C), or the designated drive letter of your removable drive, thumb drive or DVD.
The export file has the same name as the original file, but the extension is .EXP. You then see Any change ?. If the data is correct, press <Enter>, otherwise answer Y and make the changes.
(C) create new data file or (A) add records to existing data file
If you answer C (create new data file), all of the existing data records in the original file are destroyed, and the data records contained in the export file are transferred to the original file.
If you answer A (add records to existing data file), all of the existing records in the original file remain, and the data records contained in the export file are added to the original file.
Any change ?
As the file is processed, a record count displays and increments by one for each record processed.
If the program is unable to find the file, a message similar to Unable to find export (C:XXXXXX99.EXP) file displays.
Data for all companies are restored, if you selected the <F5> option for all companies.
Restore Completed
When the restore is complete, press <Esc>. Then restore another file through the above procedure, or press <Esc> to return to the previous menu.
Each time you use the utility a log file is generated. When you exit the program, it displays a message similar to this: Please review log file: xxFUTL02.LOG. The xx is substituted for the module. The number is incremented each time the utility is used and an existing log is found.
The Restore utility copies records from an exported file back to your original data file.
This maximizes the use of your disk space. When you use this utility in conjunction with the export utility, you can shrink a file so that it takes up the minimum amount of disk space for that given file. Restore reorders the records within the file itself.
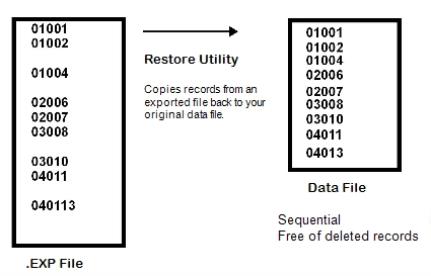
The following illustration shows the relationship between Export and Restore.
The following shows the basic reorganization that occurs when you use the Restore utility:
File maintenance applies to a PBS Vision file system and not a PBS SQL system.
Files which you periodically purge or compress can accumulate unused space within the file. When you purge records, the information is no longer available, but the records are not physically removed from the disk. The records are marked for deletion only. Purging records does not physically reduce the size of the file.
Note | In most modern computer systems, hard drive space is usually not an issue. For that reason purging files may not be necessary. If you do run out of space, rather than purge files it is recommended that you upgrade your computer with a newer larger hard drive rather than purge records. Purging may still be necessary for these reasons:
|
To recover disk space and optimize the data file, use the Export and Restore utilities. These two programs do the following:
| • | Reduce the size of the file by physically removing all records that are flagged for deletion. |
| • | Reorganize the file structure for quicker access to data. |
| • | Alert the user to any corrupt data, and reduce the risk of future file corruption by ridding the file of unused records. |
Files (and their associated applications) that you should export and restore regularly are listed below.
A/R | Customer file A/R Open Item file3 A/R Distribution to G/L file3 Invoice Header file Invoice Line Item file Invoice Auxiliary file Cash History file Customer History file Recurring Invoice Header file Recurring Invoice Line Item file Recurring Invoice Auxiliary file P/I History Header file P/I Line Item file P/I History Auxiliary file | I/C | Item file3 Layer file3 I/C Distribution to G/L file3 Inventory History file Layer file (only if using LIFO/FIFO) I/C Distribution to G/L file3 Change Item file Stocking Item file Selling Item file Change Stock Item file Change Selling Item file Kit file Work Order Cost file Component file Serial Unit file Status file3 |
A/P | Vendor file A/P Recurring Transaction file 1 A/P Open Item file (after month-end) 3 A/P Check file A/P Distribution to G/L file3 Vendor History file3 Memo Transaction file1 | PR | Employee file3 PR Distribution to G/L file3 PR History file3 QTD History file3 YTD History file3
|
PO | P/O Auxiliary file P/O Master Header file3 P/O Master Line file3 P/O Master Distribution file 3 P/O Transaction Header file P/O Transaction Distribution file3 Receivings History file3 Change Transaction Header file1 Change Transaction Line file 1 Change Transaction Distribution file * | O/E | Special Sale Price file 1 Order Header file Order Line Item file Invoice History file Quote Header file Quote Line Item file Quote Auxiliary file
|
G/L | G/L Transaction File3 | CR | Checkbook file |
JC | Job Master file Job Detail file3 Holding file 1 J/C Distribution to G/L file4 | PS | Transaction Header file3 Transaction Line file3 Transaction Comments file Transaction Payments File Transaction Serial/Lot file1 |
Notes:
1This file might be very lightly used or not at all.
2Only if LIFO or FIFO costing is used.
3This is a heavily used file.
4 Only if direct costs and/or billings are entered in J/C.
Note | NADIST (Navigator Distribution File) Recovery after File Initialization When posting and writing to the NADSIST file a backup file is always being written as well. Therefore if the original NADIST file becomes corrupt you may initialize it and use the file utilities to restore the back up file. See the Initializing Data chapter for more info on initializing a file. You will find the back up in the RWxx directory of the company where you want to do a recovery. The name of this file is BKUNADxx.DAT. Copy the file to the top level PBS and change the name to NADISTxx.EXP and use the file recovering utilities to restore it. If you have run some distributions since the file was initialized, then be sure to "Add records to existing data file". |
Rebuilding only applies to Vision data files. For SQL tables, this type of function is done by the SQL Server Management Studio. See the documentation provided with the SQL database.
Before rebuilding a file, Passport recommends that you back up your data files and verify your data files are backed up. The reason for doing this is that you must have a backup from which to restore in case any difficulties arise in rebuilding the files.
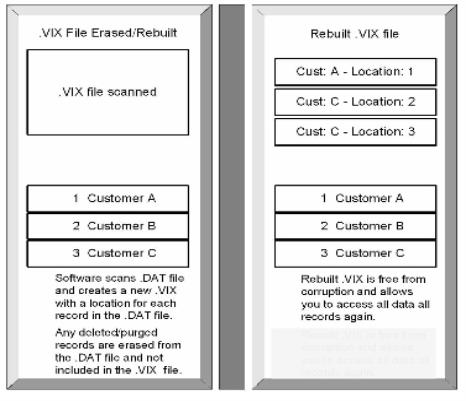
Rebuild a file performs similarly to the combined Export/Restore utilities. Rebuild erases the .VIX portion of the file and scans the .DAT portion of the file. After it scans the data records, it re-creates the .VIX, making a pointer for every record in the .DAT file.
The distinction between Rebuild and Export/Restore is that you use Rebuild only to repair a corrupt .VIX file, while Export/Restore should be used periodically for file maintenance.
Sometimes a .VIX file can become so corrupted that it cannot be rebuilt. When attempting a rebuild, if you get error messages, like 98,01, you may rename the .VIX file to .sav and then run the rebuild.
From the File recovery utilities menu, type 3. You then see a screen similar to this one shown for System:
Because of the large number of files, some modules (A/R is an example) require two screens. Press <PgDn> to reach the second screen.
As the screen shows, there are two names for each file: one in English, the other a computer abbreviation. For example, your computer recognizes the Valid G/L account file as ACCTFIXX, (00 would be used for company 00.) If you are using multiple companies, then the 2-character code for the company will appear instead.
Enter the data as follows:
Please select file
Enter the number of the data file you want to rebuild. The numbers are shown to the left of the file names.
You then see Any change ?. If the data is correct, press <Enter>. Otherwise answer Y and make the changes.
The file is then rebuilt. As the file is processed, a record count displays and increments by one for each record processed.
If you selected All companies when you started the utility, it will rebuild the selected file for all companies.
When the rebuild operation is complete, press <Esc>. Then rebuild another file using the above procedure, or press <Esc> to return to the previous menu.
Each time you use the utility a log file is generated. When you exit the program, it displays a message similar to this: Please review log file: xxFUTL02.LOG. The xx is substituted for the module. The number is incremented each time the utility is used and an existing log is found.
There is a command line prompt for running a file rebuild. All files can be rebuilt this way.
Control files can ONLY be rebuilt using this process. Normally control files do not require rebuilding because they only contain one, two or three records.
To help reduce clutter in the top-level PBS the runtime is located in the bin folder. This utility must be run from that folder. Indicate the path to the file accordingly.
The process is a little different for Windows vs. Linux/Unix. Both are documented below:
Windows
From a command prompt in the bin folder found under the top-level PBS, run a command like this:
vutil32 -rebuild (Path)/(File name)
As an example, if the file is A/P Control information for company 00 the command is similar to this:
vutil32 -rebuild c:/pbs12xx/AP00/APCTLF00.DAT
Information like the following displays:
Input = AP00\APCTLF00.DAT, Output = AP00\V4uk_2v, 1 records
Rebuilding...
....10%....20%....30%....40%....50%....60%....70%....80%....90%....100%
1 records recovered, 0 deleted records removed
Replace original file with new one? y
When the question, Replace original file with new one? displays, enter y and select the Enter key. The file is read for use.
Linux/UNIX
From a command prompt in the PBS bin folder, run a command like this:
vutil -r (file name)
When on a Linux system be sure to match the exact case for the program, path and file.
As an example, if the file is A/R Control information for company 00 the command is similar to this:
vutil -r usr/data/PBS/AR00/ARCTLF00.DAT
Information like the following displays:
Input = AR00/ARCTLF00.DAT, Output = AR00/VTMPR821T, 2 records
Rebuilding...
....10%....20%....30%....40%....50%....60%....70%....80%....90%....100%
2 records recovered, 0 deleted records removed
Replace original file with new one? y
When the question, Replace original file with new one? displays, enter y and select the Enter key. The file is ready for use.
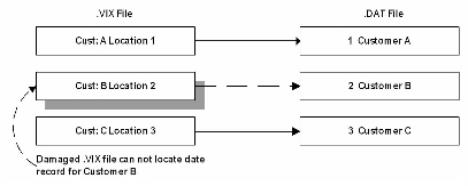
The following two illustrations show the relationship of customer records and the effects of the Rebuild utility.
The file is missing a record in the index (.vix) file:
This happens when the rebuild is done:
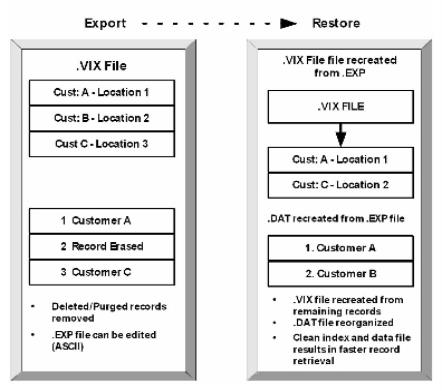
The following table compares the export/restore and rebuild utilities.
| Export/Restore | Rebuild |
Purpose | To shrink vision data files. | To repair a corrupt .vix file. |
When to use | Use regularly for file maintenance. | Use only when an .vix file has become corrupt. |
How it works | This is a two-step process. Export creates an .EXP file, erasing .DAT records marked for deletion. Restore erases the .vix file, and recreates it from the .EXP file. The .vix is created from the data in the .EXP file. | Rebuild is a one-step procedure. It erases the .vix file, then scans the .DAT file and builds a new .vix file with information for each record in the .DAT file. |
Result | .DAT is stripped of deleted records. New .vix free of pointers to deleted .DAT records. | The .vix is repaired. This occurs even if the .vix is missing. Any records marked for deletion are removed. |
You cannot extract an SQL table. Extract will only function for a Vision file.
Extract all records from a file and Remake from an extract file is only available if you select one company.
Use Extract all records from a file when Rebuild a file fails due to extreme file corruption.
Extract all records from a file dumps the records to an export file in the sequence that they appear in the data file (unlike Export a file which writes the records in the record key sequence using the index file). Using a text editor, it may be possible to locate and correct corrupt records in the export file. If you are not familiar with editing data in export files, you should contact your Passport Business Solutions provider for assistance.
System Example
From the File recovery utilities menu, type 4. A screen similar to the following displays:
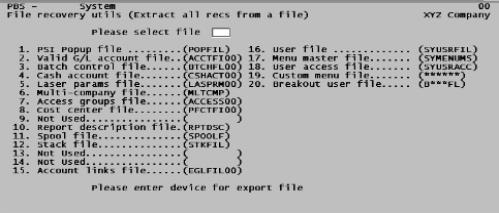
Because of the large number of files, some packages (A/R is an example) require two screens. Press <PgDn> to reach the second screen.
There are two names for each file: one in English (descriptive), the other a computer file name. For example, your computer recognizes the Valid G/L account file as ACCTFIxx. Substitute the xx for the company; 00 would be used for company 00. (If you are using multiple companies, then the 2-character code for the company will appear instead.)
Enter the data as follows:
Please select file
Enter the number of the data file that you want to extract. The numbers are shown to the left of the file names.
The file selection menu shows the name by which your computer recognizes your data file. But a data file is actually two disk files: one with a .vix extension on the end of its name, and one with a .DAT extension. An extract file is a single file and has an .EXT extension on the end of its name.
If the file you wish to extract is not displayed, it cannot be extracted using this utility.
Please enter device for export file
This is the drive on your computer where the extracted file is created.
Enter your hard disk device letter here (usually C), or possibly a network drive letter. In UNIX/Linux a drive letter is not asked for.
The export file has the same name as the original file, but the extension is .EXT.
You then see Any change ?. If the data is correct, press <Enter>. Otherwise answer Y and make the changes.
Each data record is written to the export file on a separate line. If the last field is alphanumeric, trailing spaces are truncated. Each record ends with a carriage return and line feed.
As the file is processed, a record count displays and increments by one for each record processed.
When the extract is complete, press <Esc>. Then extract another file through the above procedure, or press <Esc> to return to the previous menu.
The Inventory utilities, in addition to export, restore and rebuild, has several other utilities. The Inventory Control documentation has an appendix that describes the functions for this other utilities.
The other utilities include:
| • | Recalculate inventory quantities |
| • | Rebuild item keywords |
| • | Rebuild serial keywords |
| • | Recalculate history quantities |
| • | Create new inventory history |
To end the Data Recovery Utilities press <Esc> from the Utilities menu.
When you started the utility, if you selected Y to the question "Would you like to generate a log ?", a log file is created in the top-level PBS.
When you exit the utility, the program displays a message similar to this: Please review log file: xxFUTL02.LOG. The xx is substituted for the module. See the Module List for a complete list of possible substitutions. The number is incremented each time the utility is used for that module and an existing log is found.
The log will tell you which files or tables were exported, restored or rebuilt, the ones that were empty and the ones that were not present in a company. Here is an example of an export:
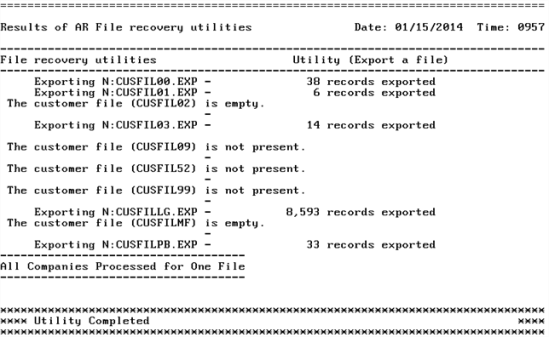
The following section applies to Control information data.
Like other data the exported control information data has a .EXP extension.
This utility provides a method of moving the control data out of one company, changing the export file name and restoring it to another company. Then you can make minor changes to the data. You may also need to run this utility before converting to a new version of PBS. To start:
Click
Programs -> PBS -> File Utilities-> Cntrl File Utilities
Or from a command prompt type:
CTLUTIL
You will be asked for a User ID and password. You must be a PBS administrative user.
If prompted, enter the two character ID of the Company you are working with. You may select <F5> for all companies.
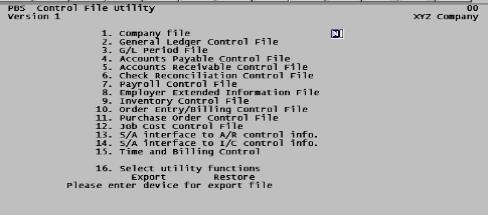
The following screen displays:
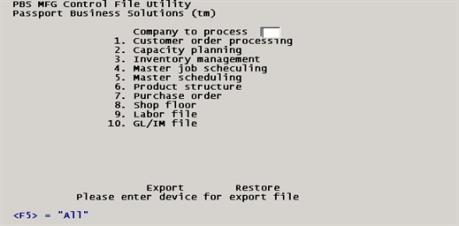
Manufacturing has a separate control data utility program. From a command prompt type:
CTLMIMPC
You will be asked for a User ID and password. You may be asked for a Company to process. Enter the company number. To process all companies select <F5>.
Manufacturing control data screen:
1. through 15. [file name]
For manufacturing:
1. through 10. [file name]
Enter Y for each file you wish to export or restore. The default is N to ignore that file.
This utility services all Passport Business Solutions modules, unlike the other file utilities (which has a separate version for each module). This means that you will see more files on the screen than you probably want. Ignore the ones that do not apply.
16. Select utility functions
Enter Y at either the Export or the Restore sub-field. You must choose one or the other, but not both.
This utility is restricted to exporting and restoring the files. Recovering corrupt data is not the intent.
Please enter device for the export file
Enter the drive to which you wish to export, or from which you wish to restore, the selected file(s).
Any change ?
Enter Y if you wish to re-enter the entire screen, or N to process the selected file(s).
When processing is complete, you will be so informed. Press <Esc> to exit the utility.
The extended file utilities enable you to run more than one utility function on all files for one or more modules. You can choose one company or all companies (if running multiple companies). There are separate programs and batches for accounting and distribution vs. manufacturing.
When upgrading to a new version of PBS you will have to run the extended file utilities to move the data out of the old version before running EZ Convert in the new version. See the EZ Convert documentation for details.
If you are running the SQL upgrade-in-place you do not have to run the extended file utilities. see the SQL install documentation.
You should be familiar with the operation of the file utilities described earlier in this chapter, prior to using the extended file utilities. From the Windows Start menu:
Click
Programs -> PBS -> File Utilities -> Extended File Utilities
When accessing the extended file utilities in UNIX, Linux or from a Windows command prompt, navigate to the top-level PBS directory and type in exfutl and select <Enter>.
The following screen displays:
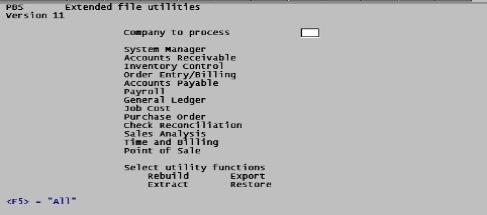
For the manufacturing extended file utilities type in exmutl from a command prompt and select <Enter>. This is the manufacturing extended utilities screen:
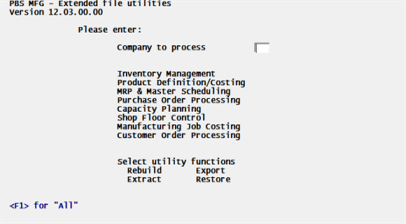
Enter the following information:
1. Company to process
Enter the 2-character company, or press <F5> for All companies. For maufacturing select <F1> for All companies.
2. through 13.
Answer Y for each package you want to select for file recovery processing or press <Enter> for N. All the files are processed for each package that you select.
14. Select utility functions
Select which processing functions to perform on the packages selected above. The functions are performed in the sequence listed for each package that you selected (one company at a time, if all companies were selected).
Note | You may not select both Extract and Rebuild. These functions are currently not available. |
Answer Y for each file recovery function, or press <Enter> for N.
You then see Any change?. If the data is correct, press <Enter>, otherwise answer Y and make the changes.
Export
If you select the Export functions, the following screen displays:
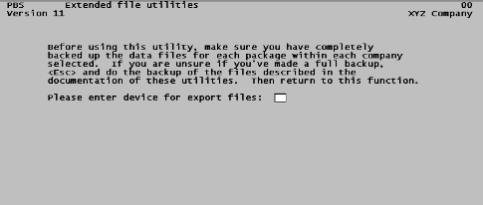
You are requested to Please enter the device for export files:
This is the destination drive for the export files. Enter your drive letter here (usually C), or the designated drive letter for your removable drive, thumb drive or DVD.
Restore
If you selected Restore as one of the options, the following screen displays:
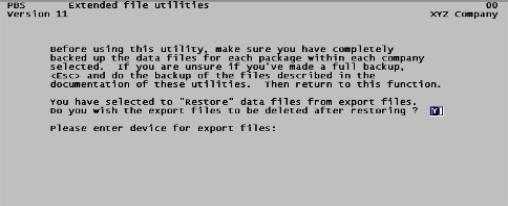
There are two confirmations with the Restore function:
Do you wish the export files to be deleted after restoring?.
Press <Enter> for the system to delete the export files after restoring, otherwise answer N.
Please enter device for export files:
This is the destination drive for the export files. Enter your disk drive letter here (usually C), or the designated drive letter for your removable drive, thumb drive or DVD.
You may select the <Esc> key to cancel.
For the selections
For all selections, a message appears informing you that the results will be stored in log file EXFUTLxx.LOG. Refer to the Log file print section.
If you selected any function, except just Rebuild (which skips to the following question), the prompt Any change ? appears. If the data is correct, press <Enter>, otherwise answer Y, and make the changes. Press <Esc> to return to the first screen.
You are then asked, OK to continue?. Answer Y to continue, or N to return to the first screen.
Processing
As each file is processed, the selected function and the file name are displayed. The record count displays and increments by one as each record is processed.
Press <Esc> to interrupt processing. Processing interrupts when the system has completed the current function on the current file. Cancel further processing ? displays. Answering N resumes processing. Answering Y terminates processing.
When processing is terminated, press <Esc>.
The export files built have the same name as the original files, but with a .EXP. extension.
Log file print
The log file contains the results of the entire procedure and is stored in a log file in the top-level directory. The digits in the file name (e.g., 01) increment each time the extended file utilities are run (EXFUTL01.LOG).
System-wide files are only exported or restored when selecting <F5> for all companies.
System-wide files include POPFIL. PDFMST, PDFLOG, MLTCMP, SPOOLF, SYUSRFIL, STKFIL and RPTDSC.
You may also use the System File Utilities to export and restore these files by company.
The navigation distribution history file (NADIST) is an important file in PBS. Often, when you generate a distribution while posting this file gets updated. At the same posting time a backup text file (BKUNAD) is also generated. This file contains all the same data that an export of NADIST would contain. The backup text file can be used to restore the navigation distribution history file if that file ever got corrupted.
The first step with any corrupted file is to rebuild it. If that does not work you must restore the backup file. Do these steps if you are in company 00:
| • | Initialize the NADIST file using syinit. Select the Navigator distr. file only. |
| • | Restore from the backup file by copying the BKUNAD00.DAT, located in the RW00 directory, to the top-level PBS directory. Substitute "00" for your company ID. |
Rename the file to NADIST00.EXP.
Restore it by running the system files utilities (syutil) for company 00 (or whatever company is involved) and select to restore the Navigator dist file.
A data utility will not run or even an install will not run if using an existing database when there are locked tables. Tables may also get locked during day-to-day processing if they are not exited properly. You may get a message like:
A file is protected by another function
Cannot run your selection now, try again later.
Here is a process to unlock or delete an AcuOpenTable:
| 1. | Insure no one is running PBS; no one is accessing the SQL data base |
| 2. | Run Microsoft SQL Server Management Studio |
| 3. | Expand Databases folder |
| 4. | Click on the named database folder called pbsmaster |
| 5. | Insure that the correct database name is shown in the list on the left: ‘pbsmaster’ is highlighted. |
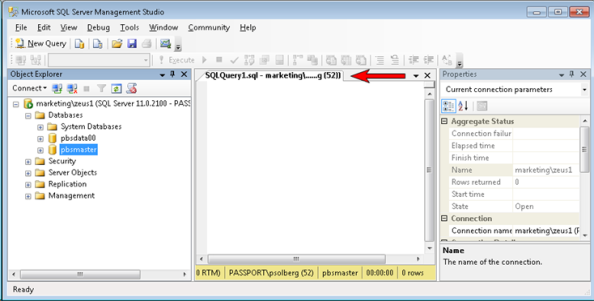
| 6. | Click on the New Query button |
Note that mousing over the tab of the query, as the arrow points to above, displays the Server name\Instance name .database name.
| 7. | Two queries can be run: |
a. Show the open locks (does nothing but shows the locked tables)
select * from pbsmaster.dbo.AcuOpenTables1
b. Delete open locks
delete from pbsmaster.dbo.AcuOpenTables1
| 8. | Enter whichever of the two queries above that you want to run and click the Execute button in the tool bar or touch <F5>. |
These queries can be saved into the database under a user assigned name and the query can be scheduled to run in off hours automatically.
| 9. | Running the Select query will produce something like the following: |
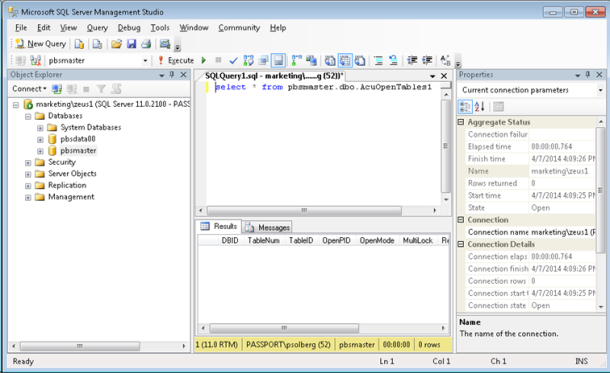
The results display in the lower half of the middle panel showing the open tables on the Results tab. In this case there were no locked tables.
| 10. | Running the delete query will produce the following: |
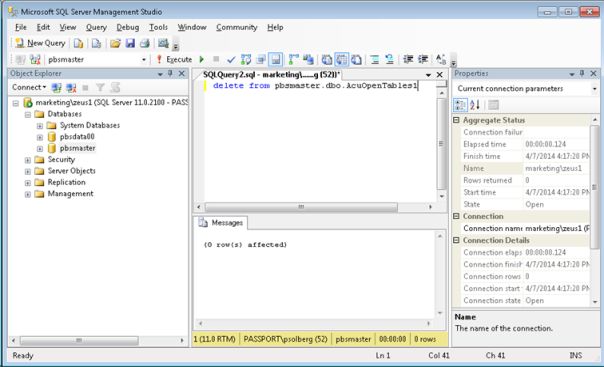
The message in the lower half of the screen indicates the number of entries deleted by the command.
If you feel it is necessary you may run a script for each PBS company that will defragment the tables. The script is available in the top-level PBS and is called PBSIndexDefrag.sql.
Do NOT defragment PBS Master.
You may defragment any PBS company. It must be run separately for each company.
It is highly recommended that you run this script when no one is accessing PBS data in the company you are defragmenting. In other words, run it during off hours.
SQL databases have built-in file utilities. See the documentation provided by SQL for information on using those systems.
For a COBOL Vision file, there are utilities built into the runtime that provide information about a file and can extract data. Some of the more useful options are provided here.
You must use these utilities from a command prompt.
Note | The runtime vutil32 utility is located in the bin folder. Based on this the path to find a file will need to be modified accordingly. Run the command from the bin folder. |
For Runtime, License and Program information see Runtime Version and License Detection in the PBS Installation chapter.
Get COBOL Vision File Information
The following does not apply when for an SQL table.
Here is an example of viewing information about a file:
Windows
vutil32 -info c:/pbs12xx/RW00/ACCTFI00.DAT
You will see information similar to the following:
# of records: | 387 |
|---|---|
# of deleted records | 0 |
file size: | 47616 (RW00/ACCTFI00.DAT) |
file size: | 30720 (RW00/ACCTFI00.vix) |
total file size: | 78336 |
segment size: | 2147482112 |
record size: | 112 |
# of keys: | 3 |
user count | 1 |
To get even more technical information include the -x option like so:
vutil32 -info -x c:/pbs12xx/RW00/ACCTFI00.DAT
Note | The commands given are for Windows. For UNIX/Linux leave out the 32 in vutilt32. An example of a UNIX/Linux command is: vutil -info RW00/ACCTFI00.DAT |
You may use this utility for extracting information. Here is an example of extracting data:
vutil32 -extract -q RW00/ACCTFI00.DAT > ACCTFI00.txt
There is no restore of these records.